How to upgrade Windows Server Essentials to a newer version – Navigating the intricacies of upgrading Windows Server Essentials to a newer version, this guide provides a comprehensive roadmap for IT professionals. Whether embarking on an in-place upgrade or opting for a clean installation, this article unravels the complexities of the process, ensuring a smooth transition to enhanced functionality and security.
With a focus on practical steps and expert insights, this guide empowers readers to confidently tackle the upgrade process, minimizing downtime and maximizing the benefits of the latest Windows Server Essentials version.


Pre-Upgrade Considerations
Before embarking on the upgrade journey, it’s imperative to assess your system’s compatibility and ensure a smooth transition. Here’s a checklist to guide you through this crucial step:
System Compatibility
Determine if your current hardware meets the minimum requirements for the newer version of Windows Server Essentials. Check for compatibility with processors, memory, storage, and network adapters.
Data Protection
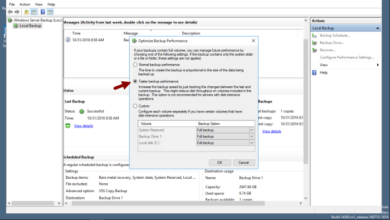
Data integrity is paramount. Create comprehensive backups of your system, including files, folders, and applications. Consider using a reliable backup solution that allows for easy restoration in case of any unforeseen circumstances.
Upgrade Planning
Minimize downtime by meticulously planning the upgrade process. Schedule the upgrade during a period of low system usage, and allocate sufficient time for the upgrade and any necessary post-upgrade configurations.
Upgrade Methods

Upgrading Windows Server Essentials to a newer version can be achieved through two primary methods: in-place upgrade and clean installation. Each approach has its advantages and drawbacks, and the choice between them depends on specific requirements and preferences.
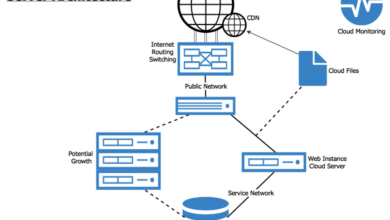
Upgrading Windows Server Essentials to a newer version involves several steps, including data backup, compatibility checks, and installation. During this process, you may encounter the need to compare different cloud server vendors. Our Cloud diagram server vendor comparison provides insights into the offerings of various providers, enabling you to make informed decisions and ensure a seamless upgrade.
In-Place Upgrade
An in-place upgrade involves installing the newer version of Windows Server over the existing installation, preserving data, applications, and settings. This method is generally faster and more convenient than a clean installation.
- Back up critical data before initiating the upgrade.
- Obtain the installation media for the newer version of Windows Server.
- Insert the installation media and launch the setup wizard.
- Select the “Upgrade” option when prompted.
- Follow the on-screen instructions to complete the upgrade process.
Pros:
- Preserves existing data, applications, and settings.
- Faster and more convenient than a clean installation.
Cons:
- May carry over any existing issues or incompatibilities.
- Can lead to performance issues if the hardware is not compatible with the newer version.
Clean Installation
A clean installation involves formatting the hard drive and installing the newer version of Windows Server from scratch. This method provides a fresh start and eliminates any potential issues or incompatibilities.
- Back up all critical data before initiating the installation.
- Obtain the installation media for the newer version of Windows Server.
- Boot from the installation media and select the “Custom” installation option.
- Format the hard drive where Windows Server is to be installed.
- Follow the on-screen instructions to complete the installation process.
Pros:
- Provides a fresh start with no existing issues or incompatibilities.
- Improves performance by optimizing the system for the newer version.
Cons:
- Requires a complete reinstallation of applications and data.
- More time-consuming than an in-place upgrade.
In-Place Upgrade Procedure
An in-place upgrade is the most common method to upgrade Windows Server Essentials to a newer version. It involves upgrading the existing operating system while preserving user data, applications, and configurations.
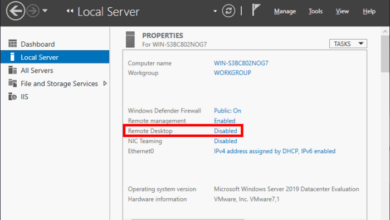
Preparing the Server
Before initiating the upgrade, ensure the server meets the following prerequisites:
- Backup all critical data to an external storage device.
- Verify that the server has sufficient disk space for the upgrade files.
- Disable any antivirus or firewall software that may interfere with the upgrade process.
- Ensure that all Windows updates are installed.
Downloading the Upgrade Package
To download the upgrade package:
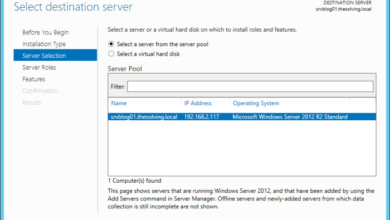
- Visit the Microsoft Download Center and search for the latest version of Windows Server Essentials.
- Select the appropriate download option for your server architecture (x64 or x86).
- Save the ISO file to a convenient location on the server.
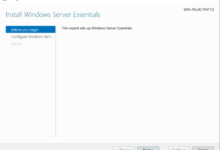
Initiating the Upgrade Process
To initiate the in-place upgrade:
- Mount the ISO file by double-clicking on it.
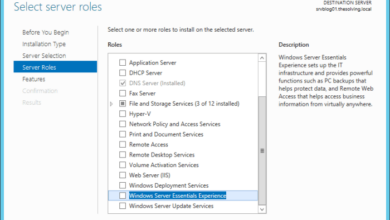
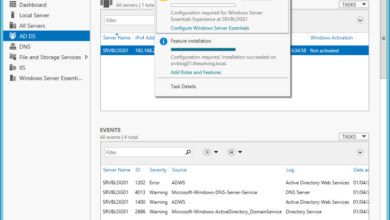
- In the autorun dialog box, select “Upgrade Windows Server Essentials.”
- Follow the on-screen instructions to complete the upgrade process.
Troubleshooting Tips
- If the upgrade process fails, restart the server and try again.
- Check the Windows Event Viewer for any error messages that may indicate the cause of the failure.
- If you encounter any other issues, refer to the Microsoft documentation or contact Microsoft support for assistance.
Clean Installation Process
A clean installation of Windows Server Essentials involves wiping the existing operating system and installing a fresh copy. While it’s more time-consuming than an in-place upgrade, it offers several advantages:
-
-*Complete OS Refresh
Removes any existing software, drivers, or configurations that may cause compatibility issues.
-*Enhanced Performance
A clean installation eliminates potential performance bottlenecks and fragmentation, resulting in a smoother and faster system.
-*Eliminates Legacy Issues
Resolves any lingering problems or errors from the previous installation.
Creating Bootable Media
To create bootable media, you’ll need a USB drive (8GB or larger) and the Windows Server Essentials ISO file. Use the Media Creation Tool from Microsoft to create a bootable USB drive:
- Download and run the Media Creation Tool.
- Select “Create installation media (USB flash drive, DVD, or ISO file)” and click “Next.”
- Choose your language, edition, and architecture.
- Select “USB flash drive” and insert the USB drive.
- Click “Next” and follow the on-screen instructions.
Configuring BIOS Settings
Before installing Windows Server Essentials, you may need to modify the BIOS settings to enable booting from USB:
- Restart the server and press the appropriate key (usually F2 or Del) to enter the BIOS setup.
- Locate the “Boot Order” or “Boot Priority” settings.
- Set the USB drive as the first boot device.
- Save the changes and exit the BIOS setup.
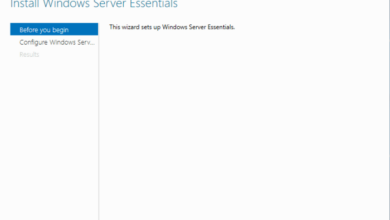
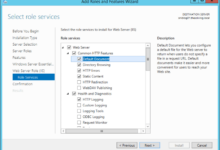
Completing the Installation Process
- Insert the bootable USB drive and restart the server.
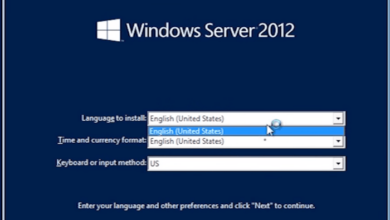
- The Windows Server Essentials installation wizard will appear.
- Follow the on-screen instructions to select your language, time zone, and keyboard layout.
- Select the drive where you want to install Windows Server Essentials and click “Next.”
- The installation process will begin. This may take several minutes.
- Once the installation is complete, the server will restart.
- Follow the post-installation configuration wizard to set up your server.
Choose “Custom
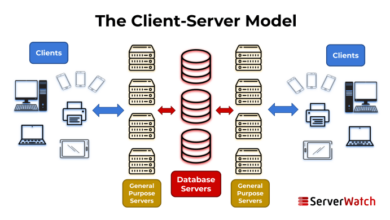
Upgrading Windows Server Essentials to a newer version can be a seamless process with the right preparation. While it’s essential to ensure a smooth transition, it’s equally crucial to consider server best practices. For valuable insights into optimizing your server infrastructure, explore Cloud diagram server best practices . This comprehensive guide provides invaluable tips and strategies to enhance server performance and efficiency.
By integrating these best practices into your upgrade process, you can not only upgrade Windows Server Essentials to a newer version but also lay a solid foundation for a robust and optimized server environment.
Install Windows only (advanced).”
Post-Upgrade Tasks

Ensuring a successful upgrade requires meticulous post-upgrade tasks. These include verifying the upgrade’s effectiveness, configuring new features and settings, and optimizing performance and security.
Verifying the upgrade involves checking for any errors or issues that may have arisen during the process. System logs, event logs, and application logs should be scrutinized for any anomalies. Additionally, testing the functionality of critical applications and services is essential to ensure they are operating as expected.
Configuring New Features and Settings
Post-upgrade often introduces new features and settings that require configuration. Reviewing release notes and documentation for these new features is crucial. Additionally, configuring security settings, network settings, and user permissions may be necessary to align with organizational policies and requirements.
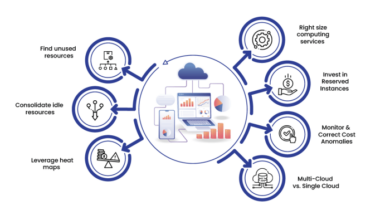
Optimizing Performance and Security, How to upgrade Windows Server Essentials to a newer version
Optimizing performance involves reviewing resource utilization, such as CPU, memory, and disk space. Implementing performance-enhancing measures, such as enabling performance monitoring tools, optimizing memory allocation, and implementing disk defragmentation, can improve system responsiveness.
Security optimization includes reviewing security settings, enabling security features such as firewalls and intrusion detection systems, and implementing regular security updates and patches. Additionally, implementing a robust backup and recovery strategy is essential to safeguard data in the event of system failures or security breaches.
Final Conclusion: How To Upgrade Windows Server Essentials To A Newer Version

By following the detailed instructions and leveraging the troubleshooting tips provided throughout this guide, readers will gain the knowledge and confidence to successfully upgrade their Windows Server Essentials environment. Embrace the latest advancements in server technology and unlock the full potential of your IT infrastructure.