Mastering Active Directory with Windows Server Essentials: A Comprehensive Guide
How to configure Windows Server Essentials for Active Directory – Welcome to the realm of Windows Server Essentials and Active Directory, where managing your network infrastructure becomes a breeze. In this comprehensive guide, we’ll embark on a journey to configure and optimize your server, ensuring a secure and efficient IT environment.
Prepare to delve into the intricacies of user management, group policies, and the backbone of your network – Active Directory.


Installing and Configuring Windows Server Essentials

Windows Server Essentials is a Microsoft server operating system designed for small businesses. It is a cost-effective and easy-to-use solution that provides essential features such as file and print sharing, remote access, and data backup. In this guide, we will provide a step-by-step guide on how to install and configure Windows Server Essentials.
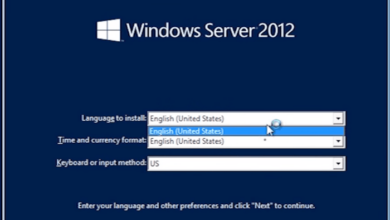
Step 1: Installing Windows Server Essentials
To install Windows Server Essentials, you will need a computer that meets the minimum system requirements. Once you have verified that your computer meets the requirements, you can begin the installation process.
- Insert the Windows Server Essentials DVD into the computer’s optical drive.
- Restart the computer and boot from the DVD.
- Follow the on-screen instructions to complete the installation.
Step 2: Configuring Windows Server Essentials
Once Windows Server Essentials is installed, you will need to configure the server. The configuration process includes setting up the server’s network settings, hostname, and other essential settings.
- To configure the server’s network settings, open the Network and Sharing Center.
- Click on the “Change adapter settings” link.
- Right-click on the network adapter that you want to configure and select “Properties”.
- In the “Properties” window, select the “Internet Protocol Version 4 (TCP/IPv4)” protocol and click on the “Properties” button.
- In the “Properties” window, enter the server’s IP address, subnet mask, and default gateway.
- Click on the “OK” button to save the changes.
- To configure the server’s hostname, open the System Properties window.
- Click on the “Computer Name” tab.
- In the “Computer name” field, enter the server’s hostname.
- Click on the “OK” button to save the changes.
Step 3: Adding Users and Groups
Once the server is configured, you can begin adding users and groups. Users and groups are essential for managing access to resources on the server.
- To add a user, open the Computer Management console.
- Expand the “Local Users and Groups” node.
- Right-click on the “Users” folder and select “New User”.
- In the “New User” window, enter the user’s name, password, and other essential information.
- Click on the “Create” button to create the user.
- To add a group, right-click on the “Groups” folder and select “New Group”.
- In the “New Group” window, enter the group’s name and description.
- Click on the “Create” button to create the group.
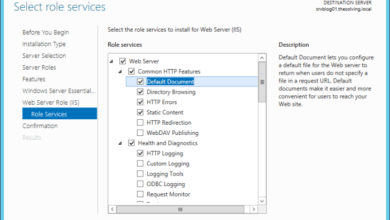
Step 4: Configuring File and Print Sharing
File and print sharing are essential features of Windows Server Essentials. File sharing allows users to access files stored on the server, while print sharing allows users to print to printers connected to the server.
- To configure file sharing, open the File Explorer.
- Right-click on the folder that you want to share and select “Properties”.
- In the “Properties” window, click on the “Sharing” tab.
- Click on the “Share” button.
- In the “Share” window, enter the name of the share and select the users or groups that you want to share the folder with.
- Click on the “Share” button to share the folder.
- To configure print sharing, open the Devices and Printers window.
- Right-click on the printer that you want to share and select “Properties”.
- In the “Properties” window, click on the “Sharing” tab.
- Click on the “Share this printer” checkbox.
- In the “Share name” field, enter the name of the share.
- Click on the “OK” button to save the changes.
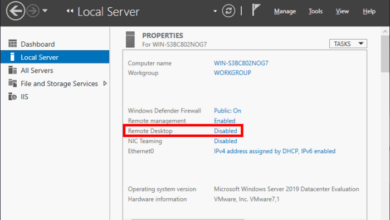
Step 5: Configuring Remote Access
Remote access allows users to access the server from remote locations. Windows Server Essentials supports remote access through the Remote Desktop Protocol (RDP).
- To configure remote access, open the System Properties window.
- Click on the “Remote” tab.
- In the “Remote Desktop” section, click on the “Allow remote connections to this computer” checkbox.
- Click on the “OK” button to save the changes.
Step 6: Configuring Data Backup, How to configure Windows Server Essentials for Active Directory
Data backup is essential for protecting your data in the event of a hardware failure or data loss. Windows Server Essentials includes a built-in backup feature that allows you to back up your data to a local hard drive or to a network share.
Getting Windows Server Essentials ready for Active Directory can be straightforward with the right guidance. If you’re seeking further insights, our Cloud diagram server white papers provide valuable information. They cover a range of topics, including best practices and troubleshooting tips, ensuring a smooth configuration process for your Active Directory environment.
- To configure data backup, open the Backup and Restore Center.
- Click on the “Set up backup” link.
- In the “Set up backup” wizard, select the type of backup that you want to perform.
- Select the destination for the backup.
- Click on the “Next” button to continue.
- Follow the on-screen instructions to complete the backup configuration.
Adding and Managing Users and Groups
Managing users and groups is essential for controlling access to resources and ensuring the security of your Windows Server Essentials environment. This section will guide you through the steps of creating, modifying, and managing user accounts and groups, as well as configuring user permissions and access rights.
Creating a New User Account and Assigning It to a Group
- In the Server Manager dashboard, click on the “Users” icon.
- Click on the “Add User” button.
- Enter the user’s name, email address, and password.
- Select the group(s) that you want the user to be a member of.
- Click on the “Create” button.
Managing User Permissions and Access Rights
Once you have created a user account, you can manage their permissions and access rights by:
- Clicking on the “Users” icon in the Server Manager dashboard.
- Selecting the user account that you want to manage.
- Clicking on the “Properties” tab.
- Selecting the “Member Of” tab.
- Adding or removing the user from groups.
- Clicking on the “OK” button.
Configuring User Profiles and Settings
You can configure user profiles and settings by:
- Clicking on the “Users” icon in the Server Manager dashboard.
- Selecting the user account that you want to manage.
- Clicking on the “Properties” tab.
- Selecting the “Profile” tab.
- Modifying the user’s profile settings.
- Clicking on the “OK” button.
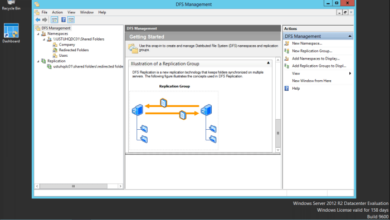
Configuring Active Directory Domain Services

Active Directory Domain Services (AD DS) is a Microsoft directory service that provides centralized authentication, authorization, and management for Windows networks. It allows administrators to manage user accounts, computers, and other resources in a single location.
To configure AD DS, you must first create a new Active Directory domain. A domain is a logical grouping of computers that share a common security boundary and set of policies. Once you have created a domain, you can add and manage domain controllers.
Domain controllers are servers that store and replicate the Active Directory database.
Create a New Active Directory Domain
- Open Server Manager.
- Click the Tools menu, and then click Active Directory Domains and Trusts.
- In the Actions pane, click New Domain.
- Follow the on-screen instructions to create a new domain.
Add and Manage Domain Controllers
- Open Server Manager.
- Click the Tools menu, and then click Active Directory Domains and Trusts.
- In the console tree, right-click the domain that you want to add a domain controller to, and then click Add Domain Controller.
- Follow the on-screen instructions to add a new domain controller.
Configure DNS and DHCP Services
DNS and DHCP are essential services for any network. DNS translates hostnames to IP addresses, and DHCP assigns IP addresses to devices on the network. To configure DNS and DHCP services, you must first install the DNS Server and DHCP Server roles on a server.
Once you have installed the DNS Server and DHCP Server roles, you can configure the services using the following steps:
- Open Server Manager.
- Click the Tools menu, and then click DNS Manager.
- In the console tree, right-click the DNS server that you want to configure, and then click Properties.
- In the DNS Server Properties dialog box, click the Forwarders tab.
- In the Forwarders list, click Add, and then type the IP address of the DNS server that you want to forward queries to.
- Click OK to save your changes.
- Open Server Manager.
- Click the Tools menu, and then click DHCP Manager.
- In the console tree, right-click the DHCP server that you want to configure, and then click Properties.
- In the DHCP Server Properties dialog box, click the DNS tab.
- In the DNS Servers list, click Add, and then type the IP address of the DNS server that you want to use.
- Click OK to save your changes.
Managing Group Policy
Group Policy allows administrators to manage settings for users and computers in an Active Directory environment. It provides a centralized way to configure security, user settings, and computer settings.
To manage Group Policy, you will need to use the Group Policy Management Console (GPMC).
To set up Active Directory in Windows Server Essentials, follow these steps: Install the Active Directory Domain Services role, promote the server to a domain controller, and configure the domain settings. For more information on server optimization, check out Cloud diagram server optimization . Once you’ve optimized your server, you can continue configuring Active Directory by creating users, groups, and computers.
Creating and Managing Group Policy Objects (GPOs)
- Open the Group Policy Management Console (GPMC).
- Right-click on the domain or organizational unit (OU) where you want to create the GPO.
- Select “Create a GPO in this domain, and link it here…”.
- Enter a name for the GPO and click “OK”.
Configuring GPO Settings
Once you have created a GPO, you can configure the settings that you want to apply to the users and computers that are linked to the GPO.
To configure GPO settings, open the GPMC and navigate to the GPO that you want to configure. In the right-hand pane, you will see a list of settings that you can configure.
To configure a setting, double-click on it and select the desired value.
Linking GPOs to Organizational Units (OUs) and Domains
Once you have configured a GPO, you need to link it to the OUs and domains that you want to apply the GPO to.
To link a GPO, open the GPMC and navigate to the OU or domain that you want to link the GPO to. In the right-hand pane, click on the “Link an Existing GPO…” button.
Select the GPO that you want to link and click “OK”.
Backing Up and Restoring Active Directory
Active Directory (AD) is a crucial component of Windows Server Essentials, and it’s essential to ensure its availability and integrity. Backing up and restoring AD allows you to recover from hardware failures, data corruption, or accidental deletions.
Creating a Backup of Active Directory
To create an AD backup:
- Open the Server Manager console.
- Click “Tools” and select “Windows Server Backup.”
- Select “Local Backup” and choose a destination for the backup.
- Under “Backup Options,” select “Active Directory.”
- Click “Start Backup” to initiate the process.
Restoring Active Directory from a Backup
To restore AD from a backup:
- Boot the server from the Windows Server Essentials installation media.
- On the “Windows Server Essentials Installation” screen, click “Repair your server.”
- Select “Troubleshoot” and then “System Image Recovery.”
- Select the AD backup you created and follow the on-screen instructions to restore AD.
Configuring Automated Backups
To configure automated AD backups:
- Open the Windows Server Backup console.
- Click “Schedule” and create a new backup schedule.
- Select “Active Directory” as the backup type.
- Configure the backup frequency, time, and retention period.
- Click “OK” to save the schedule.
By following these steps, you can ensure that your Active Directory is protected and can be recovered in the event of a disaster.
Closing Summary: How To Configure Windows Server Essentials For Active Directory
As we conclude our exploration of Windows Server Essentials and Active Directory, remember that you now possess the knowledge to harness the full potential of your network. With a solid understanding of user management, group policies, and Active Directory, you can confidently navigate the complexities of your IT infrastructure, ensuring seamless collaboration, enhanced security, and optimal performance.
Embrace the power of Windows Server Essentials and Active Directory, and elevate your network management skills to new heights.